12.4. Setting up a Network Adjustment
Setting up a network adjustment involves the same basic functions and screen for each of the adjustments. For simplicity, an overview of the steps involved is presented here.
The first step is to click on the Set Up Adjustment button on the Manager’s Page, shown in Fig. 12.2.
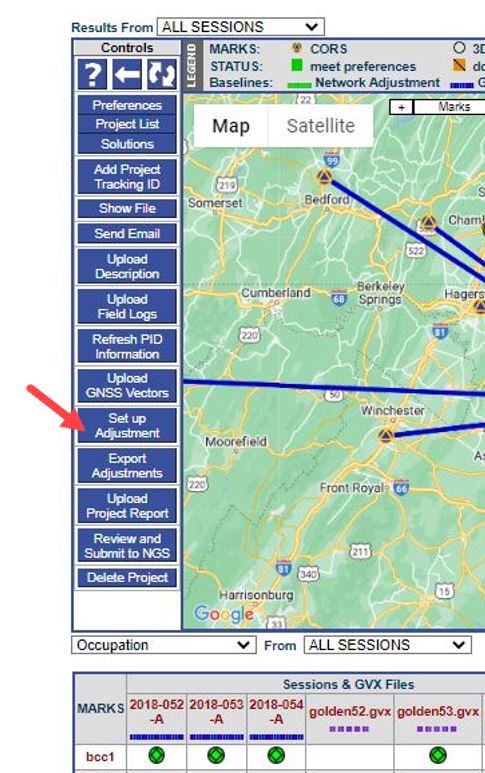
Fig. 12.2 Set up Adjustment button on the Manager’s Page controls bar
Note that the “Set up Adjustment” button will not be available (greyed out) until at least one session has been processed.
Clicking on the “Set up Adjustment” button will open up a new browser window similar to the one seen in session processing. If a Tracking ID is present, the series of five sequential network adjustment steps is listed, with the first step being the Preliminary Adjustment (see highlighted area on the left panel of Fig. 12.3). Without a Tracking ID, this section of the window is left blank (right panel of Fig. 12.3).
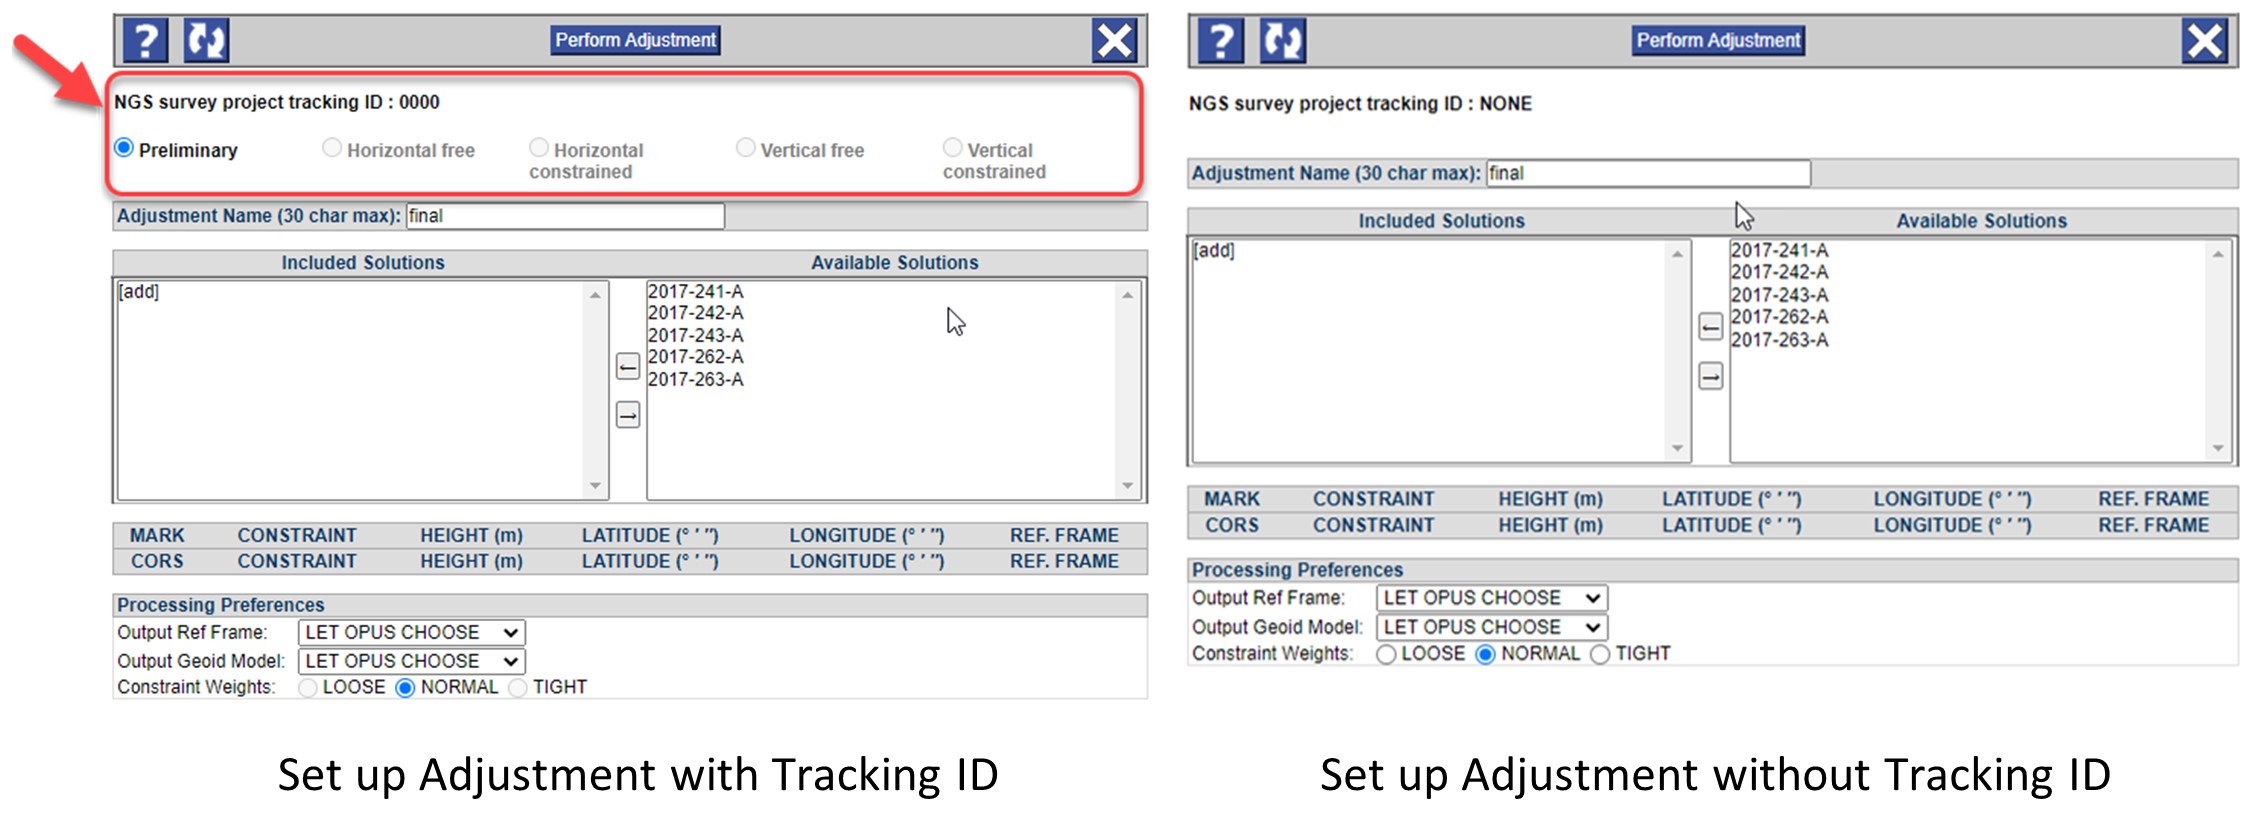
Fig. 12.3 Network adjustment windows with NGS Tracking ID and without
To perform an adjustment, the user selects the desired sessions (or solutions) and clicks on the left arrow button to move the sessions/solution(s) from the “Available” table to the “Included” table.
If multiple solutions were performed on a particular session, only one of the solutions for that session should be chosen to take part in the adjustment (see explanation of Session vs Solution in Section 11.4 and in the Glossary). Note that the Preliminary Adjustment is the only step that has all the session processing as available solutions, subsequent adjustments will only show the previous adjustment as possible input.
The user may want to run several alternative preliminary adjustments by varying the combinations of included session solutions and constraints. Each such attempt should be named so that it can be identified later.
Solution Naming Conventions in the adjustment sequence:
In the Preliminary Adjustment, OPUS by default assigns a two-part solution name, starting with the word “network” and ending in the word “final.” The two part name is therefore “network-final.” The first part of the name (“network”) cannot be altered by the user, but the second part can be changed using the “SOLUTIONS” button on the Managers Page, see Fig. 12.4.

Fig. 12.4 The Manage Solutions window, enabling the user to rename or delete any solution in the project
The second part of the name can be considered the “root” or “family” name for all the subsequent adjustments, as the two-part name is then carried forward (and cannot be changed). Recall that, although a session solution name can be changed, the session itself cannot.

Fig. 12.5 Conceptual diagram of the relationships between session solutions and network solutions in OP
Based on the results of the first preliminary adjustment, the user may feel inclined to run more than one of these adjustments. For this reason, it is recommended to change the family name of the first preliminary adjustment to something like “test1,” as shown in Fig. 12.5. In this way, it will be clear that this adjustment is run using the output of that initial, trial adjustment.
When the user has decided on the final preliminary adjustment, it is recommended to call it “final” before proceeding to the subsequent adjustments. The names of the solutions can be altered using the Solutions button on the Manager’s Page.
Tip
If multiple preliminary solutions are computed, it is recommended to delete all versions except the one to be carried forward to the next step (Horizontal Free Adjustment).
Example List of Preliminary Adjustments:
network-test1
network-test2
network-test3
network-final
Caution
“Final” and “Preliminary” are relative terms. This adjustment represents a “final” step within GPSCOM, but simultaneously, a preliminary step required to enter the ADJUST domain.
Selecting constraints and performing the adjustment
Once the desired content has been moved from the “available” window to the “included” window, a table will be generated with suggested constraints, as shown in Fig. 12.6.

Fig. 12.6 Sample Network Adjustment window showing the OP recommended selections for a Preliminary Adjustment
OP suggests constraints for each adjustment step. The CONSTRAINT column identifies the type of constraint (NONE, 3-D, VERT) applied to a MARK or CORS. All other stations are grayed out. The user should review the constraints to ensure they are as expected. To add a constraint, choose from the CONSTRAINT drop down menu. To remove a constraint, simply change the box to NONE. Once a mark is selected as a constraint, its latitude, longitude, and height are able to be edited (not recommended). For more information on constraints specific to each of the sequential adjustments intended for submission to NGS, please see Fig. 12.7.
In running the adjustment, OP assigns uncertainties to individual marks. For user marks that do not already have published coordinates, the uncertainties come from the OPUS solution used for the marks a priori coordinates (typically the first observation file for the mark seen in the project). For user marks with published coordinates, the uncertainties are taken from the datasheets. CORS are an exception. While they can be constrained to their NCN coordinates, the coordinates uncertainties are the RMS values computed from network monitoring results around the time of the project. For examples of the most recent RMS values, find the CORS short-term plots for a station via the NGS CORS page.
Caution
Estimated uncertainties (sigmas) vary according to the source of the coordinates. You can modify the sigmas by changing the source under “Manage Coordinates” on the individual mark pages. However, for submitting to NGS, any changes must be addressed in the final project report.
Make sure that the “Processing Preferences” below the MARK and CORS tables are correctly set (Output Reference Frame and Output Geoid Model are set to “LET OPUS CHOOSE” and the constraint weights is set to “NORMAL).
Review the entire window to ensure all selections are as you intended them and click the “Perform Adjustment” button at the top, as shown in Fig. 12.7.

Fig. 12.7 The “Perform Adjustment” button on the network adjustment page
A screen acknowledging the submission will appear, as shown in Fig. 12.8. Review the screen as it confirms what has been submitted for processing.
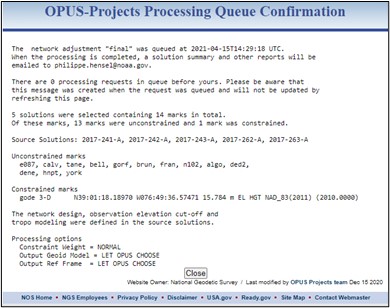
Fig. 12.8 Sample network adjustment confirmation pop-up window